
Beyond Blumlein: Other Stereo Miking Techniques For Your Ribbons And Beyond
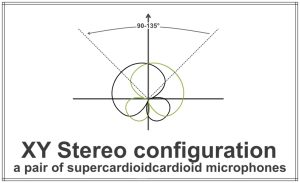
XY Stereo
For this stereo miking technique, you’re going to want to use two mics that are matched or very closely matched in regard to polar and frequency response. Many people use cardioids for this technique but super- and hypercardioids can also be used! (Both our KU5A and KU4 are supercardioids.) To determine the angle at which the mics are positioned, you’re going to want to consider a few factors: distance from the sound source, the width of the sound source, and the polar patterns of the mics you’re using. Typically, super- and hypercardioids are angled 90-135° from each other, however, there’s plenty of room for experimentation! In Wes Dooley and Ron Streicher’s paper “Basic Stereo Microphone Perspectives”, they note that using super- or hypercardioids is a good compromise between using two Figure-8 mics in Blumlein and using two cardioids in XY due to the small reverse polarity lobes found in their polar patterns. This means if you’re recording a live performance, you can still catch some of the audience reaction without it being too overwhelming and battling the actual sound source for space in the mix.
Mid/Side Stereo
Originally proposed by Alan Blumlein in 1934, but not actually realized until the 1950’s by the Danish State Radio, the MS Stereo technique can be used for both stereophonic and monophonic signals. In practice, any variation of two different polar patterns can be used, though originally Holger Lauridsen, who ran the DSR’s experiments into the matter, used a cardioid for the mid mic. The mid signal is aligned straight at the center of the sound source, with the side signal coming from a bidirectional mic positioned at 90° with the principal axis of the mid mic.
In practice, the mid signal is panned to the center, and the side signal is split in two and panned hard left and right, with one of the channels (typically the negative lobe of the bidirectional) inversed polarity. Since the side signals are perfect inversions of each other, mono summing leaves only the mid signal, as the sides cancel out.
Different combinations of polar patterns in this configuration equate to different “virtual” stereo pickups. As shown in diagram one, an omnidirectional mid with a figure 8 side mic is a lot like using two cardioid mics in a 180° XY configuration.

A cardioid mid and figure 8 side has a “virtual” transfer of two hypercardioid mics angled ±66° from center.
Why use Mid/Side when you can just use XY?
A lot of people prefer mid/side for its many variations, thanks to being able to use any polar pattern for the mid mic as well as different angles for both mics. Adjusting the amounts of each signal in the mix also gives a lot of room for experimentation, thereby also influencing the “virtual” polar patterns you get from each combination of mics. Adjusting each signal in your mix can also influence the apparent distance from the sound source and the overall ambience of the recording.
It’s historically been very useful for engineers recording for broadcast over radio, and later, television, as you can still get a very clear mono mix from M/S configurations. Typically the off axis response of a microphone is not good at higher frequencies. Having a dedicated mic pointed at the center improves high frequency response to the center of the stereo image.
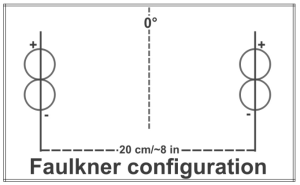
Faulkner technique (or phased array)
Developed by renowned classical recording engineer Tony Faulkner, this miking technique is intended to be used further from the sound source than the other stereo miking techniques mentioned thus far. This is to balance out the closer and further pieces in the sound source. To do the Faulkner configuration you need two figure 8 mics spaced 20 centimeters apart (a little less than 8 inches). The two mics are to be set facing the sound source, parallel to each other. The gap between the mics is meant to simulate the amount of space a human head would take up, with the mics being where our ears would be taking in the sound. Faulkner originally developed this for recording live classical performances, however it can be used in a variety of situations for any genre you’d like to try it on!
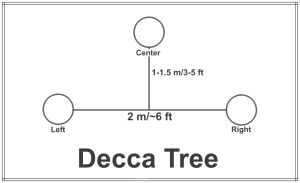
Modified Decca Tree
Designed by engineers at Decca Records in the UK during the 1950’s, the original Decca Tree uses three omnidirectional mics, spaced about 8-10 feet above the conductor’s head, in a T-shaped formation. The left and right mics are 2 meters (about 6.5 feet) apart, with a center mic right in the middle but 1-1.5 meters (3-5 ft) straight forward. The left and right mics are usually pointed out and slightly downward, with the center down at about the same angle as the left and right mics.
There have been many variations made over the years by engineers experimenting with spacing adjustments and polar pattern changes. Some people use a figure 8 for the center mic and two cardioids (or cardioid variants) for the left and right mics. Others stretch the left and right mics further away from each other and the center mic to capture more room ambience. You can even use a Blumlein, XY or MS pair in place of the center mic. There aren’t necessarily hard and fast rules for using a Decca Tree, so feel free to play around with the spacing and mics, no one’s going to kick down your door over doing it ‘wrong’!